User Authentication in NodeJS using Passport and MongoDB

If you want to protect sensitive content in your Node application, you need a way to authenticate users. However, creating your own authentication system is complex, time-consuming, and if done incorrectly can introduce security vulnerabilities into your application. Third-party tools like Passport make authentication easy.
In this tutorial, you will learn how to implement authentication in Node using Passport and MongoDB.
What are authentication and authorization?
While authentication and authorization are sometimes used interchangeably, these two security concepts have different meanings. Authentication is the process of verifying that a user is who they say they are, while authorization is determining whether an authenticated user has access to certain parts of your application.
What is Passport.js?
Passport.js (or Passport) is an authentication middleware for NodeJS that provides over 500 user authentication strategies, including local-passport which uses a username and password.
This tutorial uses local-passport and passport-jwt to secure routes.
How to configure user authentication in NodeJS
Now that you know a bit more about user authentication and Passport.js, we can see how to configure authentication on NodeJS. Below we have outlined the steps you will need to follow.
Step 1: Configure a node server
Create a folder named user-auth-nodejs and access it using your terminal.
mkdir user-auth-nodejscd user-auth-nodejs
Next Boot package.json.
npm initSince you will be using Express, a NodeJS backend framework, install it by running the following command.
npm i expressNow create a file, app.jsand add the following code to create the server.
const express = require("express");
const app = express();
const PORT = 3000;
app.listen(PORT, () => {
console.log(`Listening on port ${PORT}`);
});
Step 2: configure the database
You need a database to store user data. You will use mongoose to create a MongoDB data schema that defines the structure and type of data you will store in the database. Since you are storing user data, create a user schema.
Install the mongoose.
npm i mongooseCreate a new file, userModel.jsand add the following.
const mongoose = require('mongoose')
const {Schema} = mongoose
const UserSchema = new Schema ({
email: {
type: String,
required: true
},
password: {
type: String,
required: true
}
})
const UserModel = mongoose.model('user', UserSchema);
module.exports = UserModel;
Before storing the password, you must encrypt it for security reasons. You will use bcryptjsa very useful npm package that makes it easy to use encrypted passwords.
To install bcryptjs.
npm i bcryptjsTo modify usermodel.js to encrypt the password before saving it to the database.
const mongoose = require('mongoose')
const bcrypt = require('bcryptjs');
const {Schema} = mongooseconst UserSchema = new Schema ({
...
})
UserSchema.pre('save', async function(next) {
try {
// check method of registration
const user = this;
if (!user.isModified('password')) next();
// generate salt
const salt = await bcrypt.genSalt(10);
// hash the password
const hashedPassword = await bcrypt.hash(this.password, salt);
// replace plain text password with hashed password
this.password = hashedPassword;
next();
} catch (error) {
return next(error);
}
});
...
const User = mongoose.model('User', UserSchema);
Here you use a pre-record hook to change the password before it is saved. The idea is to store the hashed version of the password instead of the plain text password. A hash is a long complex string generated from a plain text string.
Use isModified to check if the password changes since you only have to hash the new passwords. Then generate a salt and pass it along with the plain text password to the hash method to generate the hashed password. Finally, replace the plain text password with the hashed password in the database.
Create db.js and configure the database.
const mongoose = require("mongoose");
mongoose.Promise = global.Promise;
const dbUrl = "mongodb://localhost/user";
const connect = async () => {
mongoose.connect(dbUrl, { useNewUrlParser: true, useUnifiedTopology: true });
const db = mongoose.connection;
db.on("error", () => {
console.log("could not connect");
});
db.once("open", () => {
console.log("> Successfully connected to database");
});
};
module.exports = { connect };
In app.js, connect to the database.
// connect to db
const db = require('./db');
db.connect();
Step 3: Configure Passport
To install Passport and local-passport. You will use these packages to register and connect users.
npm i passport
npm i passport-local
Create a new file, passportConfig.jsand import local-passport and the userModel.js.
const LocalStraregy = require("passport-local").Strategy;
const User = require("./userModel");
Configure Passport to manage user registration.
const LocalStrategy = require("passport-local");
const User = require("./userModel");
module.exports = (passport) => {
passport.use(
"local-signup",
new LocalStrategy(
{
usernameField: "email",
passwordField: "password",
},
async (email, password, done) => {
try {
// check if user exists
const userExists = await User.findOne({ "email": email });
if (userExists) {
return done(null, false)
}
// Create a new user with the user data provided
const user = await User.create({ email, password });
return done(null, user);
} catch (error) {
done(error);
}
}
)
);
}
In the code above you are checking if the email is already in use. If the email does not exist, register the user. Note that you are also configuring the username field to accept email. By default, local-passport expects a username, so you need to tell them that you’re sending them an email instead.
Use local-passport to also manage the user’s connection.
module.exports = (passport) => {
passport.use(
"local-signup",
new localStrategy(
...
)
);
passport.use(
"local-login",
new LocalStrategy(
{
usernameField: "email",
passwordField: "password",
},
async (email, password, done) => {
try {
const user = await User.findOne({ email: email });
if (!user) return done(null, false);
const isMatch = await user.matchPassword(password);
if (!isMatch)
return done(null, false);
// if passwords match return user
return done(null, user);
} catch (error) {
console.log(error)
return done(error, false);
}
}
)
);
};
Here, check if the user exists in the database, and if so, check if the provided password matches the database one. Note that you also call the matchPassword() method on user model then go to userModel.js file and add it.
UserSchema.methods.matchPassword = async function (password) {
try {
return await bcrypt.compare(password, this.password);
} catch (error) {
throw new Error(error);
}
};
This method compares the user password and the database password and returns true if they match.
Step 4: Configure authentication routes
Now you need to create the endpoints to which users will send data. The first step is the registration route which will accept a new user’s email and password.
In app.jsuse the passport authentication middleware you just created to register the user.
app.post(
 "/auth/signup",
passport.authenticate('local-signup', { session: false }),
(req, res, next) => {
// sign up
res.json({
user: req.user,
});
}
);
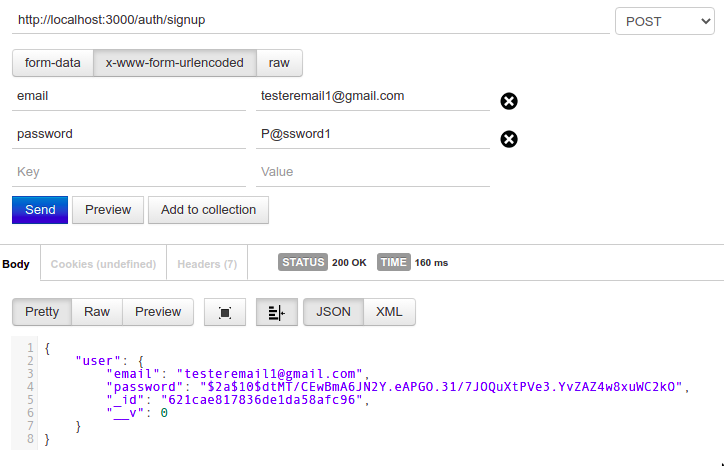
If successful, the enrollment route should return the created user.

Next, create the connection route.
app.post(
"/auth/login",
passport.authenticate('local-login', { session: false }),
(req, res, next) => {
// login
res.json({
user: req.user,
});
}
);
Step 5: Add Protected Routes
So far you have used Passport to create a middleware that registers a user in the database and another that allows a registered user to log in. Next, you will create authorization middleware to protect sensitive routes using a JSON Web Token (JWT). To implement JWT authorization, you must:
- Generate a JWT token.
- Pass the token to the user. The user will return it in permission requests.
- Check the token returned by the user.
You will use the jsonwebtoken package to manage JWTs.
Run the following command to install it.
npm i jsonwebtoken
Next, generate a token for each user who successfully logs in.
In app.jsimport jsonwebtoken and change the connection route as below.
app.post(
"/auth/login",
passport.authenticate('local-login', { session: false }),
(req, res, next) => {
// login
jwt.sign({user: req.user}, 'secretKey', {expiresIn: '1h'}, (err, token) => {
if(err) {
return res.json({
message: "Failed to login",
token: null,
});
}
res.json({
token
});
})
}
);
In a real application you would use a more complicated secret key and store it in a configuration file.
The login route returns a token if successful.
Use passport-jwt for access protected routes.
npm i passport-jwtIn passportConfig.jsconfigure it passport-jwt.
const JwtStrategy = require("passport-jwt").Strategy;
const { ExtractJwt } = require("passport-jwt")
module.exports = (passport) => {
passport.use(
"local-login",
new LocalStrategy(
...
);
passport.use(
new JwtStrategy(
{
jwtFromRequest: ExtractJwt.fromHeader("authorization"),
secretOrKey: "secretKey",
},
async (jwtPayload, done) => {
try {
// Extract user
const user = jwtPayload.user;
done(null, user);
} catch (error) {
done(error, false);
}
}
)
);
};
Note that you are extracting the JWT from the authorization header instead of the request body. This prevents hackers from intercepting a request and grabbing the token.
To see how passport-jwt guard routes, create a protected route in app.js.
app.get(
"/user/protected",
passport.authenticate("jwt", { session: false }),
(req, res, next) => {
res.json({user: req.user});
}
);
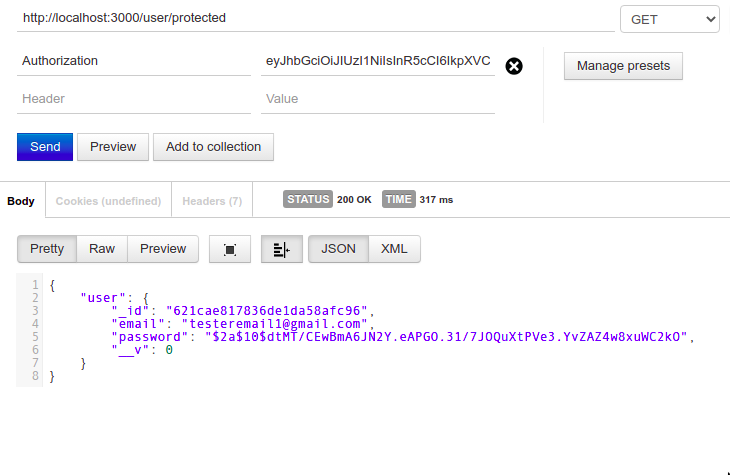
Only a query with a valid JWT returns user data.

You are now ready to take your user authentication to the next level
In this tutorial, you learned how to authenticate users using email and password using Passport. It may seem daunting at first, but the process is relatively simple. You can go one step further and use third-party identity providers supported by Passport such as Twitter, Facebook, and Google.
Read more
About the Author