How to turn off web notifications

Have you ever gone about your own business on the Internet, only to be interrupted by a notification promising “the latest news and updates” from the site you are reading? Just click Authorize. It sounds appealing, especially if it’s a website you frequent, but what does it mean?
Just as websites can share articles on social media, they can also send their content directly to your browser via push notification. If you allow these types of notifications to go through, it means that you will be pinged every time this website sends an update. These notifications are useful (in moderation), but if that doesn’t interest you, it can get annoying quickly.
There are also notifications when a website tries to use your location or wants to access your camera or microphone. If you think you’ll never want what any of these notifications have to offer, there are ways to turn them off or make them less invasive. Here’s what you need to know to control these pop-ups.
Chromium
Chrome allows you to completely turn off web notifications or turn them off for a less invasive experience. Notifications can be managed under Settings> Privacy and security> Site settings> Notifications on the web or Settings> Site settings> Notifications on an Android device. IPhone users can simply turn off pop-ups under Content settings.
By default, notifications are turned on, but that means that every time you go to a website that sends out push notifications, you will receive a pop-up message asking for your approval. If you want to turn off web notifications completely, turn off this switch.
But not receiving any notifications might not be the best solution for you, as it will also include productivity-related notifications from Gmail and Google Meet. In this case, you can either block notifications or block and whitelist individual websites.

Chrome also lets you turn on “Use quieter messaging” on the notifications settings page to keep notifications but make them less invasive while browsing. With this setting enabled, a bell icon will appear in the URL bar when a message has been blocked. Click the icon to allow notifications for the current website.
If there are specific sites with annoying notifications that you want to stop, add them to a block list, or keep everything blocked and only allow a few websites to send messages. Do this under Notifications by clicking on the Add under the Block or Allow sections and enter the URL in question. If you change your mind about a website, click on the three-dot menu and remove it from the list.
If you’re looking for better control over permissions, including location, camera, microphone, and anything that can generate their own notifications, go back to site settings and you can control permissions for all websites.
If this all sounds too complicated, you can skip it and browse in incognito mode, which blocks notifications by default.
Firefox

Firefox knows it users hate pop-up notificationsso it did something by allowing websites to ask for your permission only if you interacted with the page in some way. Otherwise, a small notification in the address bar will allow you to allow or block notifications. There are also several ways to manage notifications.

To control notifications for a single website, click the lock icon in the address bar, and then select Secure connection> More information to open the Page Info window. Click the Permissions tab and scroll down to Send Notifications. If you want to change the notification settings, uncheck “Use as default”, then choose between Always ask, Allow and Block.
A much easier way is to open the hamburger menu in the browser and navigate to Settings> Privacy and security, then scroll to the Permissions section. Here, you can allow websites to access location data and computer devices, as well as receive notifications.
If you activate Suspend notifications until Firefox restarts, all notifications will be disabled until your next browsing session. For something more permanent, click Settings next to Notifications.
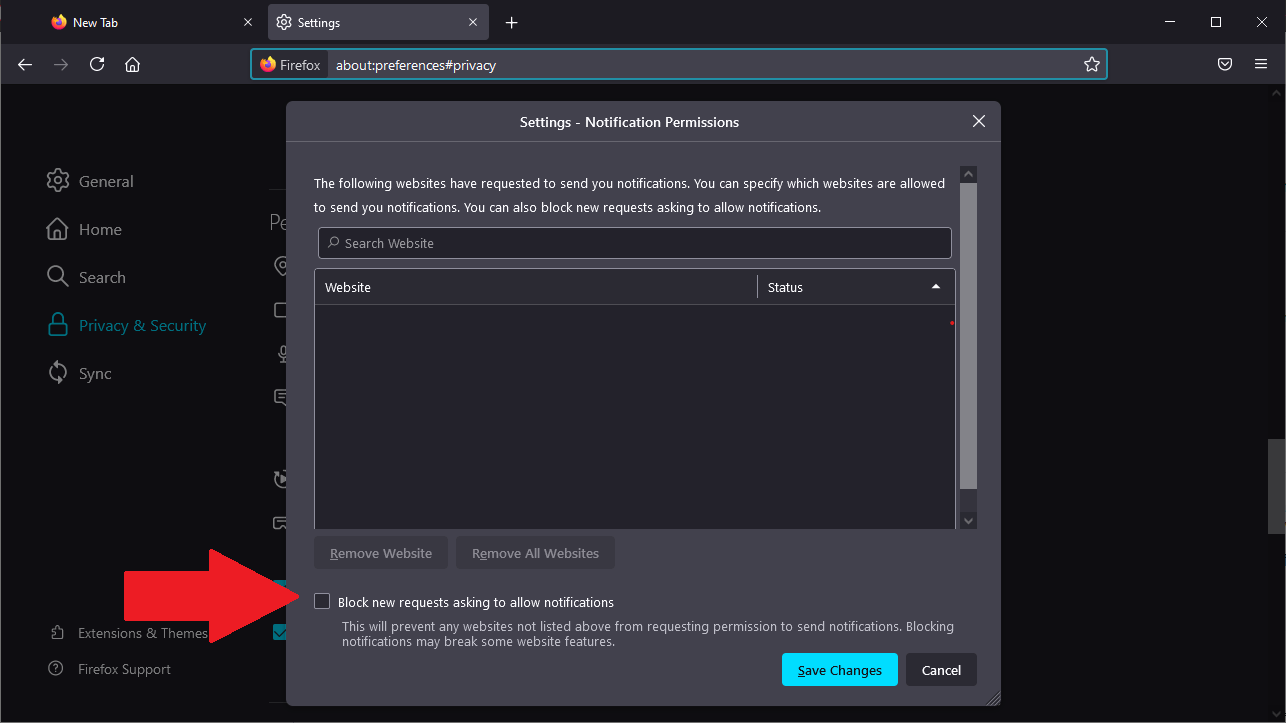
A menu will display a list of websites that you have previously blocked or allowed directly from the notification prompts. If there are items on the list that you want to change, use the drop-down menu to toggle between Blocked and Allowed, or you can remove them from the list completely.
Check the box at the bottom of the menu next to Block new requests asking to allow notifications to block all new notification requests in the future.
Safari

Since Safari is an Apple product, you can manage notifications both in browser settings and in System Preferences. With Safari open, navigate to the top menu of macOS and select Safari> Preferences> Websites> Notifications to view all websites to which you have allowed or denied notification permissions.
Use the drop-down menu for each entry to change permissions, or highlight a website and click Remove to remove it completely. You can also uncheck the box next to Allow websites to request permission if you want to completely stop pop-up notifications.

Notifications can also be managed at the operating system level. Go to System Preferences> Notifications> Safari and turn off Allow notifications to turn them off completely. If you just want notifications to be less annoying, customize how you want them to appear.

Another option available to Mac users is Do Not Disturb, which will turn off all notifications for a while. Head toward System Preferences> Notifications> Do Not Disturb to customize how it will work. Click it Control center icon in the top menu and select Do not disturb to turn it on quickly at any time.
Notifications on iPhone are a whole different animal. You can manage them through the Settings or Do Not Disturb screen.
Edge

Microsoft’s Edge browser looks a lot like Chrome, so there is a way to manage web notifications. Click on the three-dot menu in the upper right corner and select Settings> Cookies and site permissions. This is where you can control camera and microphone access permissions, location information, notifications, and more.
To choose Notifications to find a page similar to what Chrome offers. By default, notifications are set to “Ask before sending,†which got you here in the first place. You can turn off this option to completely eliminate notifications or keep Discreet notification requests to make sure pop-ups won’t interrupt your browsing.

If you choose discreet notifications, websites that try to send requests will display a bell icon in the address bar. You can click this icon and then click Authorize this site to be notified or Manage to open the Notifications page in Settings.
An individual website can also be added to the block or allow lists by clicking the button Add button and entering a URL. You can also set permissions for a specific website, including notifications, by clicking the lock icon in the address bar and choosing Permissions for this site. Permissions can then be set to Request, Allow, or Block.